Video productions are built at varying ends of a scale. At one end you have the camera and at the other end you have editing. Sometimes more or even of all the magic happens at the camera end of the scale such as the one continuous shot music video for Kiesza “Hideaway” (2014) leaving nothing to do in editing, whereas you have films like Peter Jackson’s “They Shall Not Grow Old” (2018) that are built entirely at the editing end of the scale, relying purely upon archive footage restoration, ADR and sound design (as covered in ‘Can you make a film without filming?’). Generally speaking, I will usually spend twice the amount of time in post production that I spend filming and I cannot overstate the importance of editing. Editing is the film equivalent of how a writer combines words and paragraphs to tell a story. It is the secret ingredient that makes some films so much more watchable and enjoyable than others regardless of budget or subject matter.
What sets great editing apart from the rest is how a sequence or juxtaposition of shots can add so much to the storytelling or how the pace or tempo can ramp up the tension. There is so much to say about genius editing throughout the history of cinema, from the stabs of “Psycho” (1960) where film cuts are used to evoke a knife frenzy without showing one single stab or drop of blood, to the multi-award-winning visual Jazz of Tom Cross on “Whiplash” (2014) and “La La Land” (2016). Special mention also to Jay Rabinowitz for the hyper-real, quick-cut, micro-montages in “Requiem for a Dream“ (2000) which has been copied, pastiched and parodied ever since. What these editors achieve is primarily through the same cut-and-splice techniques of the celluloid era with no need for fancy VFX. So for the novice, editing can be very easy to pick up. It’s a bit like boxing whereby pretty much anyone can grasp the concept of throwing and dodging punches, but to master takes time and dedication.
Note: I am a life long Final Cut Pro user as Adobe Premier is garbage, though I do hear good things about DiVinci Resolve, but the fundamentals should carry across to any platform.
1. The six rules
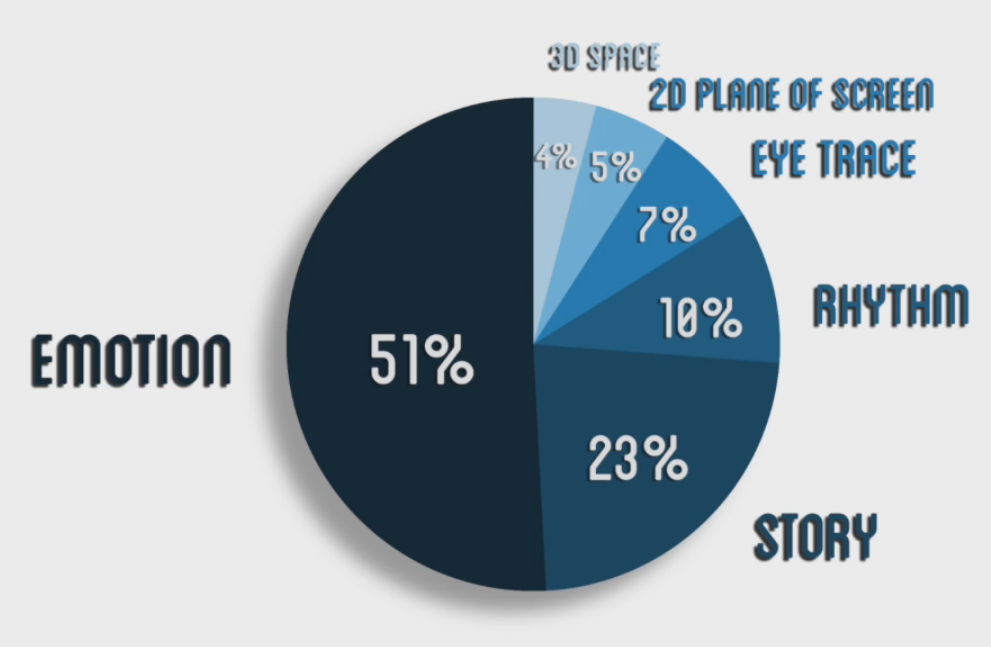
As with filming, it is essential to have your brain in the right gear before you make one single cut otherwise you’ll find yourself going around in circles, attempting every possibility and wasting an enormous amount of time. Legendary editor, director and sound designer Walter Murch developed the six rules of priority in editing: emotion, story, rhythm, eye trace, 2D plane, and 3D space.
Emotion is king and so can overwrite even aspects of story if it nails it well enough. There is no need for verbal exposition if the visual alone can tell that story. Emotion gives you a reason to hold on a static shot for just that little bit longer before moving on because you want the audience to see, feel, smell and taste the cinematic world you are creating.
Story underpins emotion as this is the structure upon which the emotion will sit. Story or narrative doesn’t apply only to dramas. An advert, a video of a party… everything should have some form of start, middle and ending at the very least.
Rhythm is like the flow of language: point and counterpoint, call and response, individual words, flowing sentences, pauses for breath and complete full stops. Cutting to music helps as you have the hit points in the music that you can cut to but similarly, there can also be a form of visual rhythm or pattern (e.g a truck shot along railings) which can provide a form of tempo. Editing rhythm also cues the audience to expect something at a certain time which the editor can choose to deliver or to subvert expectations and show something unexpected on that beat. This is very effectively used with jump scares in horror.
Eye trace is used to lead from one shot into the next by following where a subject is looking. For example if one subject is looking downward towards the camera and the subject of the next shot is looking upwards towards the camera, this establishes a sense of their vertical relative placement. Eye trace is where you would apply the 180º rule whereby each subject should generally occupy an equal and opposite space on the screen between cuts, crossing an imaginary centre line. This helps to better orient the audience in terms of space. This rule can be totally ignored however if the film-maker deliberately wishes to provide a feeling of disorientation and discomfort.
Then at the lower end of the priority scale are 2D plane and 3D space which simply means the relationship between shots in terms of the space. The 2D plane can act as a guide on how to better transition between shots e.g. ending and starting a shot on a pedestal camera movement. A movie that does an excellent job of 3D space and is, in my opinion, one of the top 10 movies of all time is “Predator” (1987), as director John McTiernan takes the environment of a jungle which is a naturally confusing place and does a tremendous job in giving the audience a feel for where everything is geographically by including in shots glimpses of where the characters have been and where they are going next, so you start to build up a map of the location of the log where Billy makes his last stand, in relation to the waterfall and the river where Dutch finally comes face to face with his alien pursuer. The “Lord of the Rings” also does a good job of tracking the journey across Middle Earth to the contained areas of battle scenes so you have a good feel of where everything is taking place.
Ultimately, remember the six rules and you will find that not only will you be able to make editing choices faster and with more confidence but also you can often be surprised how a shot that you may not have considered can absolutely pop and set your project off.
2. Building an edit = laying bricks
The actor Will Smith once made an inspirational speech which has stuck with me. He said, “You don’t set out to build a wall, you set out to lay one brick as perfectly as a brick has ever been laid”. I love that. As enormous and daunting the task of editing can be when you start out, remember that all you are doing is making sequences. You place one solid gold clip that you are absolutely committed to using and then place another either before or after. Repeat that process a few hundred more times a voila, you got yourself a film.
Having formally studied art and music I have always found the hardest thing to do is to get started. Give me a remix to do, and I’ll jump right on it, but that moment when paint is first committed to canvas or a piano melody is recorded to tape is where you are the most exposed. Creativity can be viewed as a massive process of distillation. With music, the aim is to take a whole desk of faders and mix it all down to the one single volume control of the listener. With films, they take multi-million-pound productions and eventually, it’s all squeezed onto a single DVD.
Of all the infinite ideas you could have for a video project, you have selected one, thereby eliminating all others. Of all the various ways you could have filmed your project including the camera configurations and the shots, you decide to do it in a certain way thus constantly narrowing down and refining what you are doing. If you follow all of the processes set out in this guide, by the time you go to start editing you should have narrowed things down to a handful of shots tagged to fall within a specific section of your project to which you should then apply the six rules. Eventually, you’ve narrow all of the billions of options down to one clip.
The main mistake I see people making is that they dump all of their footage onto the main timeline and delete the stuff that isn’t working. This is not a good way of working as it takes so much longer and what you are doing from the outset is not an act of deliberate and considered creation but more of a coincidental exercise in making a pile of junk a little bit less of a mess. That will rarely result in any kind of impactful or profound artwork, though it is possible to have happy accidents. A prime example of pumping a timeline full of unrelated, random junk and expecting someone to watch it is “Life Remote Control” by the world’s biggest charlatan hack Thierry Guetta aka Mr Brainwash, which lead to the film “Exit Through the Gift Shop” by his equally hacky, predictable, mouse stencilling, charlatan mentor Banksy. Chose your shots with care, place them with care and the wall will build itself.
Over my career, I have developed two main methods of building an edit. These techniques come in most useful for live/random/spontaneous subject matter or instances where a strict pre-existing plan does not exist. So for videography, live events and some documentary work, which is most of what I do, they work great.
Cheese Cake – This is based on the idea of looking at your edit like a cheesecake. At the base, you have your rock-solid and reliable foundation – your biscuits. This foundation should be able to work all on its own without needing to add anything though it perhaps may be a little safe. On top of that you start to add slightly more interesting stuff like the custard, then the cream, then the berries, each layer getting more fancy, a little more daring though less reliable than the base foundation. So when you watch it back you’re guaranteed good footage throughout, but at certain points, you’ll get treated to something a little more special. This works great when filming things like music where you have your main safe camera angle of the entire performance, then on top of that you add alternative angles depending on what’s happening with the performance, then on top of that, you could include cutaways, abstract shots and even overlay effects. It’s a really fast and reliable way to work as you know that at any point you can strip away the upper layers to reveal something totally fine and usable beneath.
Tetris – In December 2021 I got hooked on Tetris Effect on PSVR. I cannot express how amazing an experience it is, and it comes as no surprise that it is made by the master of synesthesia and creator of “Rez” (2001) Tetsuya Mizuguchi. The game’s title “Tetris Effect” relates to a medically studied phenomenon of people remapping their cognitive processes to the processual experience of fitting blocks in place after having played Tetris for a number of hours. At the same time, I was working on an edit and all of a sudden found that, having locked in place the key structural shots of the edit, I would then cycle through the various possible shots to fit in between as if I was rotating through different blocks in a game of Tetris, speeding up my work rate massively. The Tetris technique is to first drop into place the key shots or anything else you are 100% on, and for everything in between you sequentially cycle through your pool of potential shots like a conveyor belt (having already been tagged in the proper way). Final Cut offers the audition feature where you can cycle through clips in place which is ideal for this technique. Through this process you will eventually use up all your options and your edit will be constructed, essentially cycling through the perfect bricks with which to build your wall.
3. Creative cuts
There are many type of cuts you can make but here are a few to keep in your tool box.
Jump cuts involve making small jumps in time within the same scene to speed up a scene. Jump cuts also provide a good opportunity to add a little rhythm using the jumps.
Action cuts involve simply matching one cut to another based on the action of a subject. For example, if a subject turns their head to look left, you can then cut to a different angle and potentially also a different take where this same action completes.
Match cuts are similar to action cuts in that they also follow the flow of action only they will then jump to a different time or location, a technique used a lot by director Edgar Wright.
Cross cuts involve cutting between different times and spaces to aid narrative in particular to add tension. They are used heavily in crime-investigation-type dramas (e.g “Saw” 2004) to show the detective closing in on the culprit or to jump back and forth in time. This can also be used to great effect to misdirect an audience such as in the finale of “Silence of the Lambs” (1991), where you’re led to believe the FBI has found the killer only to reveal that they’re actually at the wrong location whilst Clarice Starling had entered the domain of the killer.
Cutaways use b-roll either as a means to hide cuts, add interest or give the audience a better feel for the surrounding environment and the film world.
Montage is a sequence that jumps around in time and is a good way to show progress in a shot space, most famously the training montage for “Rocky” (1976).
4. Transitions
For the most part you don’t need transitions when editing. Humans have comfortably accepted cuts from one shot to the next just as easily as we blink our eyes. I’d almost go as far as to say to avoid transitions if you can. The epitome of amateur is a string of cross-dissolves (and believe me I’ve been paid to re-edit out stuff like that). Also in high-end movies, too much transitioning gets exhausting as it doesn’t give the audience a chance to catch their breath as one scene ends and then the next begins. A couple of examples of this are the later Saw sequels that would use transitions, like a glass shatter effect, between scenes that made no consistent sense between the two shots of the contained film world. Like yeah, the victim in one scene just broke a window, but what does that have to do with the agent in the interview room in the next scene? It makes it needlessly confusing for the sake of style. Also, as mentioned previously Egar Wright is known for his creative editing, but when he doesn’t stop doing it in “Last Night in Soho” (2021) it just becomes jarring. This sort of thing is fine for a music video but for longer-form content, it’s just too much sugar in the coffee.
However sometimes transitions can be great and I was particularly proud of the journal transition in “Out of Sight, Out of Mind: The Leavesden Asylum Story” (2020). The ornate words penned in ink appear from the intertwined branches of the undergrowth in keeping with the theme of the film of the story being physically imprinted in the location. The pages of the journal then seemingly blow in behind the displaced words as if history reforming from dust. Finally, a reversed shadow overlay of the bars of a prison takes the viewer into the next scene.
This was a very technical and artistic sequence of transitions to tell a very specific story, but if I could pick my top 6 goto transition types that I use most often they would be…
Fade to black/colour is perhaps the most classic transition of all. Unlike crossfade, fade to black brings the previous scene to an elegant close whilst implying a passing of time before softly bringing in the next scene. Fading in and out of blackness also looks moody. That said you needn’t always have fades on both sides. Sometimes a cut to fade or vice versa can provide sharp punctuation in counterpoint to the smooth fade to snap you into the next scene.
Motion transitions can be done in post or in camera, such as whipping the camera in a direction to end/start a shot and using the resulting motion blur as a transition. This can be a clever way to hide cuts as is a signature move of Tom Cross.
Mask wipes involve something in the foreground of one scene to cover a wipe into the next scene. It’s similar in feel to a match cut as it is both smooth and seamless and keeps you within the filmic world. This can be achieved in a stock transition effect though sometimes mask animation can provide a more precise effect. A really simple example is using a wall or pillar sliding into the frame in the foreground obscuring the subject from sight and then revealing the next scene.
Light-based transitions are like the effect of getting the sun in your eyes and then seeing something new revealed. I used AleFX TransLight as it gives a nice natural-looking light leak effect but a similar result can also be achieved with light leak overlays.
Electronic media style transitions like glitch and analogue noise can be nice in the right context though the type of effect you want to use sparingly unless you want to pull a Thierry Guetta.
Smoke/Fog based transitions. These are very fancy so I don’t use them very often and again they are definitely context based but as with some of the other transitions I have mentioned, there’s just something nice about their randomness that can deliver some nice surprises. As with any effect, if you can do it in camera, nothing beats the real thing.
So far we’ve covered strategy, camera operation, filming, media management and editing. Next time, in a swerve from the predictable we’re going to look at audio post-production.